
Fortune's Weave BLD, Weight & Luck Guide: Read Stats and Growths
A source-marked Fortune's Weave BLD, Weight, Luck, and growth guide: read the official stat screen, test equipment penalties, and make safer class decisions.
Short answer: use BLD (Build) and equipment Weight as an immediate before-and-after check, but use the growth screen to decide a character’s longer-term direction. Nintendo officially confirms that each character’s growth rate is visible and indicates which basic stats, including Strength and Speed, are more likely to increase. Its public material does not publish a complete BLD, Weight, or Luck formula. Treat the practical BLD formula below as community-reported and verify it on your own current-version stat and battle screens before committing scarce equipment or a class path.
This is an independent fan guide, not Nintendo or Fire Emblem official support. It separates what Nintendo has documented, what players have reported, and what you can reproduce in your own save. That distinction matters: a useful build decision is often possible before every hidden formula is known, but an unmarked guess is not a reliable guide.
The decision path: what to check first
Use this sequence whenever a unit feels slower, misses a follow-up, or you are choosing between a weapon, accessory, or class. It keeps the decision local to the next map instead of turning a single displayed number into a permanent ranking.
- Read the next job. Is the unit meant to take a hit, secure a follow-up, avoid doubles, carry a heavy option, or simply reach a target? Write that job in one sentence.
- Take a baseline. Record the current class, level, BLD, Speed, Attack Speed, Avoid Rate, equipped weapon, equipped accessory, and the version shown on the title screen.
- Change one item only. Equip the candidate weapon or accessory, then capture the same fields again. A one-change comparison is more useful than trying to infer a rule from two different classes and several buffs.
- Read the result, not just the label. If Attack Speed or Avoid Rate changes, decide whether the new damage, range, effect, or durability earns that loss on the next map.
- Use growth information for the long view. A growth indicator tells you which basic stat is more likely to rise over levels; it does not replace a current equipment check.
- Retest after a patch or role change. Nintendo’s update history confirms the game has received updates. A conclusion recorded on one version should be dated rather than treated as timeless.
The table below is deliberately short. It answers the search intent without pretending that every label has a published formula.
| Question | Direct, evidence-marked answer |
|---|---|
| What is BLD in Fortune’s Weave? | BLD means Build. Community reports connect it to how equipment Weight changes displayed combat values; Nintendo has not published the full calculation. |
| Does BLD matter? | Check it when a weapon or accessory changes Attack Speed or Avoid Rate. It is not a substitute for Strength, Magic, Speed, positioning, or the map objective. |
| What does Luck do? | Record the game’s own tooltip and resulting combat values. Nintendo’s public sources used here do not define a complete Luck formula, so older-series assumptions are not treated as facts. |
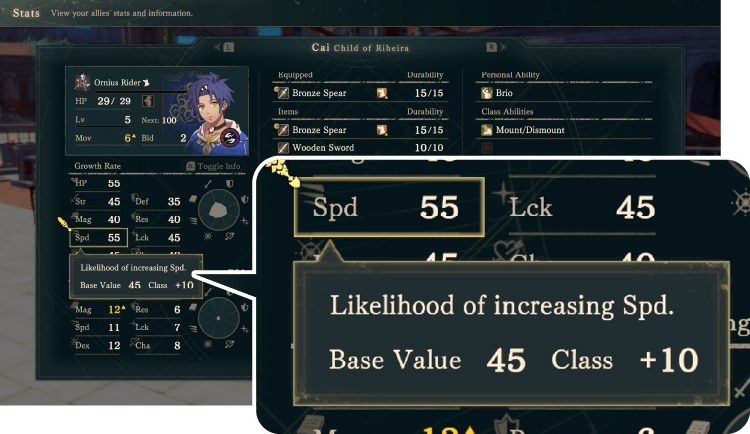
| How do growth rates work? | Nintendo confirms visible rates help indicate which basic stats are more likely to rise. The official Cai example shows Speed 55 as Base Value 45 plus Class +10. |
| Should I choose a class for its growths? | Compare the official visible growth breakdown, certification requirements, weapons, skills, movement, and the equipment result after changing class. Do not use an unsupported all-class table. |
| Is there a universal best build? | No. A high-damage option that loses a follow-up can be worse on one map and right on the next. Compare the actual before/after screen. |
For the surrounding choices, use the class guide, weapon types guide, growth rates guide, and route character comparison. Those pages answer different questions; none should be used to fill in a formula that its evidence does not support.
Start with the official growth screen
Nintendo’s Ask the Developer interview is the strongest available source for the growth-screen basics. The developers say the game makes each character’s growth rate visible for the first time in the series, so players can see which basic stats, such as Strength or Speed, are more likely to increase. The interview also says characters can generally choose any class when they meet the skill requirements and pass certification exams. That supports a planning workflow: inspect the person first, then choose the class and equipment that solve the current job.
The official image below is the original Nintendo-hosted interface example, not a fan-made reconstruction. It shows Cai as an Ornius Rider and presents Speed growth 55 as Base Value 45 + Class 10. It is evidence that this displayed example contains a class contribution. It is not evidence for every character’s numbers, every class modifier, a percentage sign on every field, a BLD rule, or a Luck rule.
When you inspect a character, keep three kinds of information apart:
- Current stats describe the unit in the present battle state. They can be affected by class, equipment, skills, temporary effects, and the game’s UI context.
- Visible growth values describe a likelihood direction for future level-ups, according to Nintendo’s explanation. A value is not the current stat and is not a promise that the next level produces that stat.
- Build decisions are choices you make now: class access, weapon access, equipment Weight, range, terrain, combat arts, route timing, and the specific enemy lineup.
That separation avoids a common error: reading “55” as current Speed or treating a favorable growth display as a reason to ignore a present Attack Speed penalty. The official screenshot is most useful as a method lesson—open the same panel, read the breakdown that your game shows, and note which parts actually change when you change class.
What BLD and Weight can tell you today
BLD means Build. The public Nintendo material cited on this page does not publish its combat formula. Community players have nevertheless reported a repeatable relationship between a unit’s BLD, the combined Weight of equipment, and displayed battle values. Treat the following as a player-tested working model, not an official Nintendo formula:
effective Weight = max(0, total equipment Weight - BLD)
reported Attack Speed and Avoid Rate change = -effective Weight
The model makes a concrete prediction. With BLD 5 and total equipment Weight 4, effective Weight is 0. With the same BLD and total Weight 8, effective Weight is 3. A clean test compares the same unit, same class, same map state, and same version before and after the equipment change. If the displayed values do not move as the model predicts, record the exception instead of forcing the result to fit an older Fire Emblem rule.
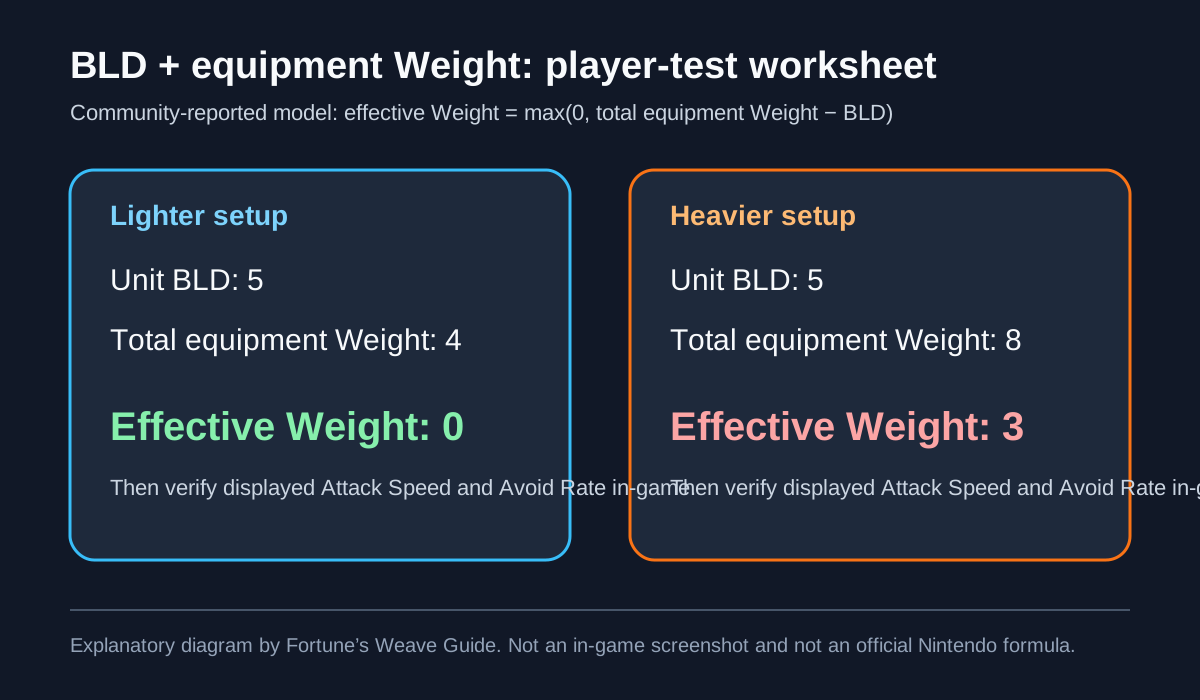
The worksheet is deliberately more modest than a weapon ranking. It demonstrates what to compare, not which named item is always best. An accessory can change the total just as meaningfully as a weapon, so do not compare weapon Weight in isolation. If a loadout produces a slower displayed result, that may still be acceptable when it gains a needed range, effect, durability profile, or one-hit threshold. If it costs a follow-up or exposes a unit on enemy phase, bring the lighter option back into the comparison.
A reproducible equipment comparison
Use a note or screenshot pair that another player can repeat:
| Field to capture | Before change | After change | Why it matters |
|---|---|---|---|
| Game version and map | Same version, same map state | Same version, same map state | Prevents a patch, terrain state, or encounter context from masquerading as a Weight result. |
| Unit and class | Same unit, same class | Same unit, same class | Keeps class effects out of an equipment test. |
| BLD and Speed | Record both | Confirm unchanged | Shows whether you changed the carry context rather than the equipment alone. |
| Weapon and accessory Weight | List every equipped item | List every equipped item | The community model concerns total equipment Weight, not only the weapon. |
| Attack Speed and Avoid Rate | Record visible values | Record visible values | These are the outcomes to inspect, not just the inventory label. |
| Battle consequence | Note follow-up, survival, or hit plan | Note follow-up, survival, or hit plan | Converts the number change into a map decision. |
Do not convert one anecdote into a universal rule. A screenshot without the menu context, game version, item list, and unit details cannot establish a formula. It can still be useful evidence for a personal decision if you label it as one run’s observation.
How BLD differs from growth, Strength, and Speed
BLD is not simply another number to maximize. The official growth discussion tells us why visible growths are valuable: they help you judge which basic stats are more likely to rise as a character develops. It does not say that every field on a character screen has the same role or that a high growth number automatically makes a build good.
Think in three practical layers. Strength or Magic usually matter when you need a unit to convert an opening into damage. Speed matters when the current matchup makes a follow-up, an enemy follow-up, or a turn order threshold important. BLD and Weight matter in the narrower situation where a planned loadout changes the battle values you actually see. A unit may have a promising long-term Speed direction and still lose that advantage under a heavy setup; another may carry a heavier tool without a visible cost and gain a useful combat option. Those are distinct decisions.
Before changing class, test the loadout that you expect the class to use. Before changing equipment, inspect whether the current class and route objective even reward the thing you would lose. A defensive map may justify a heavier setup that preserves a chokepoint. A map where the unit must avoid a double or finish an exposed enemy may reward the lighter choice. The right answer is a documented trade, not a fixed tier-list label.
How to read character growth rates without overpromising
The official Cai example gives a safe reading method. First, look at the selected basic stat and its displayed total. Second, note the base and class values where the interface supplies them. Third, compare that direction to the job you need the unit to do. Fourth, test the immediate equipment consequences rather than assuming a later level-up repairs a current weakness.
The most important restraint is probability. Nintendo’s wording is that visible growth rates show which basic stats are more likely to increase. A growth rate does not guarantee the next level, set a unit’s current stat, prove a stat cap, or establish a complete public table. It also does not prove a universal class formula merely because one official screenshot includes a class contribution. Record exact values only where the game screen or an official source makes them legible.
Community spreadsheets and discussion threads can be valuable leads for which screen to check, but they are not a replacement for a cited in-game image or Nintendo documentation. When a community post supplies values, preserve its version, date, route context, and uncertainty. Do not silently turn a data-mined list, a partial playthrough, or a copied table into an official claim.
A practical growth-rate reading exercise
Suppose a character’s screen suggests a stronger Speed direction than another stat. That tells you Speed is worth watching over future levels. It does not settle whether to equip a heavier weapon right now. Make the weapon comparison first. Then ask whether the selected class is accessible through its stated skill requirements, what weapon and Combat Art options it opens, and whether the next map rewards that role. This small loop is more useful than declaring that a character is “ruined” or “fixed” from one level-up.
Nintendo also explains that players can develop the same character in different directions across playthroughs and that accumulated character data later merges. That makes testing a route-specific role especially worthwhile, but it does not remove the need to document your version and test conditions. A build that worked in one route’s enemy mix may be an experiment, not a universal recommendation.
What to do with Luck and other under-documented fields
Luck appears in player conversations because it is visible and players want a clear priority order. The available official pages linked below do not give this guide a complete Luck formula, a critical-hit formula, or permission to import one from a previous Fire Emblem game. Therefore the responsible answer is: read the game’s tooltip and observed combat result first; keep any broader formula provisional.
That is not an empty answer. It gives you a focused test. Capture the unit’s Luck and relevant battle forecast values, change one source of the suspected effect if the game allows it, and repeat in matching conditions. If the tooltip gives a direct definition, quote that in your own notes with the version. If it does not, record the observation as community-reported rather than official. The same discipline applies to Authority, mounts, fixed-growth theories, and claims that a particular class always corrects a character’s weaknesses.
Equipment before and after: turn a stat screen into a decision
An equipment choice becomes much clearer when you put the numbers beside a map question. Start with the baseline unit. Equip the heavier candidate. Then answer four questions: did Attack Speed change, did Avoid Rate change, did the unit gain a relevant damage/range/effect advantage, and does the next enemy phase make the loss safe? If the answer to the first two is unknown, the item is not ready for a categorical recommendation.
For example, the BLD 5 worksheet does not say that total Weight 8 is bad. It says the community model predicts three effective Weight, so you should compare the actual displayed outcome. If those three points remove a needed follow-up, the lighter option can be the better tactical tool even when it has less raw power. If the heavier item reaches a decisive threshold or lets the unit survive a specific threat, it can be right for that map. Save both setups when possible; versatility is often more valuable than forcing every unit into one permanent loadout.
When you compare post-certification equipment, add one more check: repeat the same before/after procedure without changing multiple things at once. A class change can alter access, movement, skills, and possibly a displayed growth contribution. If you change class, weapon, accessory, and support state together, no result can tell you which factor mattered.
Common mistakes when building around BLD, Weight, Luck, and growths
Mistake: treating a community formula as a Nintendo rule
The BLD/Weight model is helpful precisely because it is testable. It is not made stronger by calling it official. Cite it as community-reported, show the conditions, and update it when a reproducible counterexample or official manual appears.
Mistake: copying older Fire Emblem definitions
Shared stat names do not guarantee shared mechanics. Use older games only as a question generator: “Does this game work the same way?” Then look at Fortune’s Weave’s own tooltip, screen, update version, and battle result. A familiar formula is not evidence.
Mistake: confusing a growth display with a current stat
The official Cai image makes this easy to see: the Speed growth breakdown is about future likelihood, while current combat decisions are made from the live state. A high visible growth cannot retroactively change an unfavorable matchup today.
Mistake: testing several variables at once
Changing class, weapon, accessory, skill, and map position at once creates a story, not a test. Change one variable, keep a record, and state what you did not control.
Mistake: declaring Luck useless or mandatory without a source
Player opinions can be useful for understanding why a stat feels important, but opinions do not define a formula. Label community discussion as discussion and link it as supplementary reading.
Mistake: choosing a class from a growth number alone
Nintendo confirms certification requirements and flexible class choices. Use that freedom to compare role, access, map demands, and actual equipment results. A visible class contribution in one official example does not replace all the other costs of a change.
Watch the official overview before testing
The Nintendo of America overview trailer is useful context for the game’s four-hero structure and battle presentation. It is not used here as proof of a stat formula; use the Nintendo interview and your own interface checks for that. The responsive embed below uses the site’s registered component rather than a raw iframe.
FAQ
What does BLD mean in Fortune’s Weave?
BLD means Build. The public Nintendo material linked here does not publish a complete formula. Community players report that comparing BLD against total equipment Weight predicts changes in displayed Attack Speed and Avoid Rate; treat that as player-tested and verify it in your own current-version screen.
Does BLD reduce all equipment Weight automatically?
The community-reported working model is effective Weight = max(0, total equipment Weight minus BLD). It is not an official Nintendo formula. Keep weapon and accessory lists in the test, then compare the live battle values before relying on the result.
What does Luck do in Fortune’s Weave?
This guide does not state a complete Luck formula because the cited official sources do not publish one. Use the in-game tooltip and a controlled before/after test; community discussion is supplementary reading, not proof.
Are Fortune’s Weave growth rates visible?
Yes. Nintendo says each character’s growth rate is visible and indicates which basic stats, such as Strength and Speed, are more likely to rise. Nintendo’s Cai example shows Speed 55 as Base Value 45 plus Class 10.
Do classes affect growth rates?
The official Cai screenshot demonstrates a class contribution in that displayed Speed example. It does not establish a complete all-class table or a universal formula. Record the class and breakdown shown in your own game before publishing exact values.
How should I compare a heavier weapon or accessory?
Keep the unit, class, map state, and version fixed. Record BLD, total equipment Weight, Attack Speed, Avoid Rate, and the relevant enemy threshold before and after changing one item. Choose the setup that solves the next map problem, not simply the one with the higher raw stat.
Sources
Sources and verification
Official sources
- Nintendo: Ask the Developer Vol. 23, Part 2 — visible growth rates, the official Cai Speed example, certification/class freedom, and the interview’s pre-release context.
- Nintendo: Fire Emblem: Fortune’s Weave store page — official game and trailer context.
- Nintendo Support UK: update history — Version 1.0.1 (September 17, 2026) and Version 1.1.0 (October 15, 2026); neither note provides a BLD, Weight, or Luck formula.
Community discussion and supplementary reading — not proof of official mechanics
- r/FE_Fortunes_Weave: beginner stat discussion — player reports about BLD, Weight, and displayed combat values; use as a testing lead.
- r/fireemblem: growth-rate discussion — player-collected growth observations and disagreement; not treated here as official data.
- r/fireemblem: question thread — general player questions and observations about accessories and Weight.
Verification method used on this page
- Official claims are limited to what Nintendo’s pages explicitly describe or visibly show.
- The official stat-interface image is hotlinked from Nintendo and captioned with its source and pre-release interview context.
- The Weight graphic is an original explanatory worksheet, not an in-game screenshot; it illustrates a community-reported test case and labels its uncertainty.
- BLD, Weight, Luck, Authority, fixed-growth, and full-table claims remain conditional unless an official source or reproducible in-game test supports them.
Last verified: 2026-10-16